Nginx-快速入门和提高

简介

Nginx 是一个web 服务器和方向代理服务器,用于HTTP、HTTPS、SMTP、POP3 和IMAP 协议。
Nginx 是由伊戈尔·赛索耶夫为俄罗斯访问量第二的Rambler.ru 站点开发的,第一个公开版本0.1.0 发布于2004 年10 月4 日。

Nginx 使用可扩展的事件驱动架构,而不是更传统的过程驱动架构。
Nginx 开发的目标是实现10倍以上的性能,优化服务器资源的使用,同时也能够扩展和支持网站的动态增长。

因此,Nginx 成为最知名的模块化、事件驱动、异步、单线程Web 服务器和Web 代理之一。

Nginx安装

  1. 下载Nginx

    1
    wget http://nginx.org/download/nginx-1.17.0.tar.gz
  2. 安装依赖

    1
    2
    yum -y install pcre-devel
    yum -y install openssl openssl-devel
  3. 解压下载目录,进入到解压目录中

    1
    2
    3
    ./configure
    make
    make install
  4. 安装默认位置

    1
    /usr/local/nginx/sbin/nginx
  5. 启动Nginx

    1
    ./nginx

特点

  • 更快。单次请求会得到更快的响应,并且在高并发环境下,Nginx 比其他Web 服务器有更快的响应。
  • 高扩展性。
  • 高可靠性。Nginx 的可靠性来自于其核心框架代码的优秀设计,模块设计的简单性。
  • 低内存消耗。理论上,Nginx 支持的并发连接上限取决于内存,10万远未封顶。
  • 热部署。Master 进程与Worker 进程的分离设计,使得Nginx 能够提供热部署功能。
  • BSD 许可协议。

命令

常用命令如下:

1
2
3
4
5
6
7
8
nginx -s stop      # 快速关闭Nginx,可能不保存相关信息,并迅速终止web服务。
nginx -s quit # 平稳关闭Nginx,保存相关信息,有安排的结束web服务。
nginx -s reload # 因改变了Nginx相关配置,需要重新加载配置而重载。
nginx -s reopen # 重新打开日志文件。
nginx -c filename # 为 Nginx 指定一个配置文件,来代替缺省的。
nginx -t # 不运行,而仅仅测试配置文件。nginx 将检查配置文件的语法的正确性,并尝试打开配置文件中所引用到的文件。
nginx -v # 显示 nginx 的版本。
nginx -V # 显示 nginx 的版本,编译器版本和配置参数。

目录建议

1
2
3
4
5
6
7
8
9
10
11
12
13
14
15
16
17
18
19
20
21
22
23
$dir/wwwroot/                           - 网站根目录,以域名为文件夹名称
./vgbhfive.cn/
./static.vgbhfive.cn/

$dir/src/ - 安装源包

$dir/local/nginx/ - nginx相关根目录
./conf/ - 配置文件
./nginx.conf - 配置主入口
./inc - 通用配置
./vhost/ - 各站点的配置,以 `域名.conf` 命名
./vgbhfive.cn.conf
./static.vgbhfive.cn.conf

./1.11.1/ - 各个版本的nginx
./1.11.2/

$dir/logs/ - 日志相关目录,内以 `域名.type.log` 命名
./last/ - 最新的日志
./vgbhfive.cn.error.log
./vgbhfive.cn.access.log
./back/ - 天级备份日志
./20190808/

基础

用途

  • 静态代理
    Nginx 擅长处理静态文件,是非常好的图片、文件服务器。把所有的静态资源的放到nginx 上,可以使应用动静分离,性能更好。
  • 负载均衡
    Nginx 通过反向代理可以实现服务的负载均衡,避免了服务器单节点故障,把请求按照一定的策略转发到不同的服务器上,达到负载的效果。
    常用的负载均衡策略:
  • 轮询
    将请求按顺序轮流地分配到后端服务器上,它均衡地对待后端的每一台服务器,而不关心服务器实际的连接数和当前的系统负载。
  • 加权轮询
    不同的后端服务器可能机器的配置和当前系统的负载并不相同,因此它们的抗压能力也不相同。给配置高、负载低的机器配置更高的权重,让其处理更多的请。而配置低、负载高的机器,给其分配较低的权重,降低其系统负载,加权轮询能很好地处理这一问题,并将请求顺序且按照权重分配到后端。
  • ip_hash(源地址哈希法)
    根据获取客户端的IP 地址,通过哈希函数计算得到一个数值,用该数值对服务器列表的大小进行取模运算,得到的结果便是客户端要访问服务器的序号。采用源地址哈希法进行负载均衡,同一IP地址的客户端,当后端服务器列表不变时,它每次都会映射到同一台后端服务器进行访问。
  • 随机
    通过系统的随机算法,根据后端服务器的列表大小值来随机选取其中的一台服务器进行访问。
  • least_conn(最小连接法)
    由于后端服务器的配置不尽相同,对于请求的处理有快有慢,最小连接数法根据后端服务器当前的连接情况,动态地选取其中当前积压连接数最少的一台服务器来处理当前的请求,尽可能地提高后端服务的利用效率,将负责合理地分流到每一台服务器。
  • 限流
    Nginx 的限流模块,是基于漏桶算法实现的,在高并发的场景下非常实用。
    1
    2
    3
    4
    limit_req_zone $binary_remote_addr zone=mylimit:10m rate=100r/s
    location /server2 {
    limit_req zone=mylimit burst=20 nodelay;
    }
    配置参数:
  • limit_req_zone 定义在Http 块中,$binary_remote_addr 表示保存客户端IP 地址的二进制形式。
  • Zone 定义IP 状态及URL 访问频率的共享内存区域。zone=keyword 标识区域的名字、以及冒号后面跟区域大小。
  • Rate 定义最大请求速率。

设置限流:

  • burst 排队大小,nodelay 不限制单个请求间的事件。
  • 缓存
  • 浏览器缓存,静态资源缓存用expire
  • 代理层缓存
  • 黑白名单
  • 不限流白名单
    1
    2
    3
    if ($remote_addr !~ ^(100.110.15.16|100.110.15.17|100.110.15.18|127.0.0.1)) { # $remote_addr 和$http_x_foeward_for 记录客户端的ip 地址
    rewrite ^.*$ /maintence.php last;
    }
  • 黑名单
    1
    2
    3
    4
    5
    6
    7
    location / {
    deny 10.52.119.21;
    deny 122..12.1.0/24;
    allow 10.1.1.0/16;
    allow 1001:0db8::/32;
    deny all;
    }

Nginx 配置

默认配置 - nginx.conf
1
2
3
4
5
6
7
8
9
10
11
12
13
14
15
16
17
18
19
20
21
22
23
24
25
26
27
28
29
30
31
32
33
34
35
36
37
38
39
40
41
42
43
44
45
46
47
48
49
50
51
52
53
54
55
56
57
58
59
60
61
62
63
64
65
66
67
68
69
70
71
72
73
74
75
76
77
78
79
80
81
82
83
84
85
86
87
88
89
90
91
92
93
94
95
96
97
98
99
100
101
102
103
104
105
106
107
108
109
110
111
112
113
114
115
116
117
118
119
# 全局块
#user nobody;
worker_processes 1;

#error_log logs/error.log;
#error_log logs/error.log notice;
#error_log logs/error.log info;

#pid logs/nginx.pid;

# events 块
events {
use epoll;
worker_connections 1024;
}

# http 块
http {
# http 全局块
include mime.types;
default_type application/octet-stream;

#log_format main '$remote_addr - $remote_user [$time_local] "$request" '
# '$status $body_bytes_sent "$http_referer" '
# '"$http_user_agent" "$http_x_forwarded_for"';

#access_log logs/access.log main;

sendfile on;
#tcp_nopush on;

#keepalive_timeout 0;
keepalive_timeout 65;

#gzip on;

# server 块
server {
# server 全局块
listen 80;
server_name localhost;

#charset koi8-r;

#access_log logs/host.access.log main;

# location 块
location / {
root html;
index index.html index.htm;
}

#error_page 404 /404.html;

# redirect server error pages to the static page /50x.html
#
error_page 500 502 503 504 /50x.html;
location = /50x.html {
root html;
}

# proxy the PHP scripts to Apache listening on 127.0.0.1:80
#
#location ~ \.php$ {
# proxy_pass http://127.0.0.1;
#}

# pass the PHP scripts to FastCGI server listening on 127.0.0.1:9000
#
#location ~ \.php$ {
# root html;
# fastcgi_pass 127.0.0.1:9000;
# fastcgi_index index.php;
# fastcgi_param SCRIPT_FILENAME /scripts$fastcgi_script_name;
# include fastcgi_params;
#}

# deny access to .htaccess files, if Apache's document root
# concurs with nginx's one
#
#location ~ /\.ht {
# deny all;
#}
}

# http 全局块
# another virtual host using mix of IP-, name-, and port-based configuration
#server {
# listen 8000;
# listen somename:8080;
# server_name somename alias another.alias;

# location / {
# root html;
# index index.html index.htm;
# }
#}

# HTTPS server
#server {
# listen 443 ssl;
# server_name localhost;

# ssl_certificate cert.pem;
# ssl_certificate_key cert.key;

# ssl_session_cache shared:SSL:1m;
# ssl_session_timeout 5m;

# ssl_ciphers HIGH:!aNULL:!MD5;
# ssl_prefer_server_ciphers on;

# location / {
# root html;
# index index.html index.htm;
# }
#}

}

主要包含内容:

  • 全局块:
  • events 块:
  • http 块:
  • server 块:
  • location 块:
配置示例
1
2
3
4
5
6
7
8
9
10
11
12
13
14
15
16
17
18
19
20
21
22
23
24
25
26
27
28
29
30
31
32
33
34
35
36
37
38
39
40
41
########### 每个指令必须有分号结束。#################
#user administrator administrators; #配置用户或者组,默认为nobody nobody。
#worker_processes 2; #允许生成的进程数,默认为1
#pid /nginx/pid/nginx.pid; #指定nginx进程运行文件存放地址
error_log log/error.log debug; #制定日志路径,级别。这个设置可以放入全局块,http块,server块,级别以此为:debug|info|notice|warn|error|crit|alert|emerg

events {
accept_mutex on; #设置网路连接序列化,防止惊群现象发生,默认为on
multi_accept on; #设置一个进程是否同时接受多个网络连接,默认为off
#use epoll; #事件驱动模型,select|poll|kqueue|epoll|resig|/dev/poll|eventport
worker_connections 1024; #最大连接数,默认为512
}

http {
include mime.types; #文件扩展名与文件类型映射表
default_type application/octet-stream; #默认文件类型,默认为text/plain
#access_log off; #取消服务日志
log_format myFormat '$remote_addr–$remote_user [$time_local] $request $status $body_bytes_sent $http_referer $http_user_agent $http_x_forwarded_for'; #自定义格式
access_log log/access.log myFormat; #combined为日志格式的默认值
sendfile on; #允许sendfile方式传输文件,默认为off,可以在http块,server块,location块。
sendfile_max_chunk 100k; #每个进程每次调用传输数量不能大于设定的值,默认为0,即不设上限。
keepalive_timeout 65; #连接超时时间,默认为75s,可以在http,server,location块。

upstream mysvr {
server 127.0.0.1:7878;
server 192.168.10.121:3333 backup; #热备
}
error_page 404 https://www.baidu.com; #错误页
server {
keepalive_requests 120; #单连接请求上限次数。
listen 4545; #监听端口
server_name 127.0.0.1; #监听地址
location ~*^.+$ { #请求的url过滤,正则匹配,~为区分大小写,~*为不区分大小写。
#root path; #根目录
#index vv.txt; #设置默认页
proxy_pass http://mysvr; #请求转向mysvr 定义的服务器列表
deny 127.0.0.1; #拒绝的ip
allow 172.18.5.54; #允许的ip
}
}
}

常见配置项:

  • $remote_addr 与 $http_x_forwarded_for: 用以记录客户端的ip地址。
  • $remote_user: 用来记录客户端用户名称。
  • $time_local: 用来记录访问时间与时区。
  • $request: 用来记录请求的url与http协议。
  • $status: 用来记录请求状态;成功是200。
  • $body_bytes_s ent: 记录发送给客户端文件主体内容大小。
  • $http_referer: 用来记录从那个页面链接访问过来的。
  • $http_user_agent: 记录客户端浏览器的相关信息。
  • 每个指令必须以分号结束。

惊群现象:一个网络连接到来,多个正在睡眠的进程被同时叫醒,但只有一个进程能获得链接,这样会影响系统性能。

事件模型

  • epoll
  • poll
  • select
  • kqueue
  • rtsig
  • /dev/poll/
  • eventport

架构

1.jpg
主要包含以下内容:

  • 主进程
  • 工作进程
  • 模块化设计
  • 事件驱动模型
  • 代理设计

提高

模块化设计

高度模块化的设计是Nginx 的架构基础。Nginx 服务器被分解为多个模块,每个模块就是一个功能模块,只负责自身的功能,模块之间遵循“高内聚,低耦合”的原则。
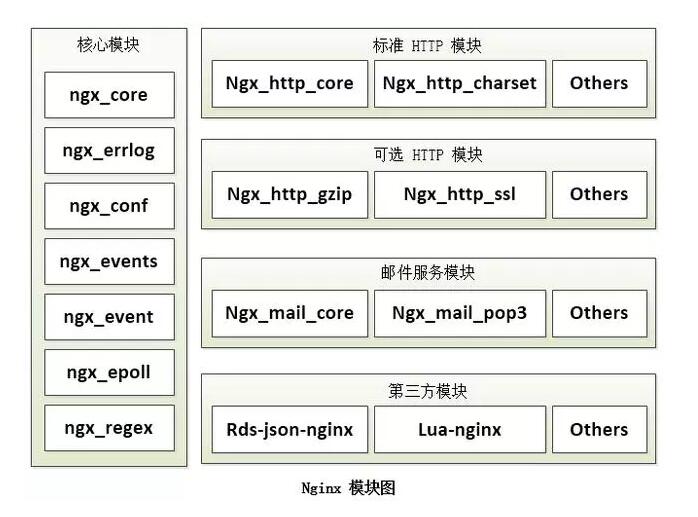
1.jpg

  • 核心模块
    核心模块是Nginx 服务器正常运行必不可少的模块,提供错误日志、配置文件解析、事件驱动机制、进程管理等核心功能。
  • 标准HTTP 模块
    标准HTP 模块提供HTTP 协议解析相关的功能,如:端口配置、网页编码配置、HTTP 响应头设置等。
  • 可选HTTP 模块
    可选HTTP 模块主要用于扩展标准的HTTP 模块,让Nginx 能处理一些特殊的服务,如:Flash多媒体传输、解析GeoIP 请求、SSL 支持等。
  • 邮件服务模块
    邮件服务模块主要用于支持Nginx 的邮件服务,包括对POP3 协议、IMAP 协议、SMTP 协议的支持。
  • 第三方模块
    第三方模块是为了扩展Nginx 服务器应用,完成开发者自定义的功能,如:Json 支持、Lus 支持等。

请求方式

Nginx 是一个高性能的Web 服务器,能够同时处理大量的并发请求。它结合多线程机制和异步机制,异步机制使用的是异步非阻塞方式。

  1. 多线程
    服务器每当收到一个客户端时,就有服务器主进程(Master Process) 生成一个子线程(Worker Process) 出来和客户端建立连接进行交互,直到连接断开,该子进程就结束了。
    使用线程的好处在于各个进程之间相互独立,不需要加锁,减少了因为锁对性能造成影响,同时降低编程的复杂度,降低开发成本。
    其次,采用独立的进程,可以让进程互相之间不会影响,如果一个进程发生异常退出时,其他进程正常工作,Master 进程则很快启动新的Worker 进程,确保服务不中断,将风险降到最低。

    缺点是操作系统生成一个子线程需要进行内存复制等操作,在资源和时间上会产生一定的开销,当有大量的请求时,会导致系统性能下降。

  2. 异步非阻塞
    每个工作进程使用异步非阻塞方式,可以处理多个客户端请求。当某个工作进程接收到客户端的请求之后,调用IO 进行处理,如果不能立即得到结果,就去处理其他请求(非阻塞)。
    而客户端在此期间也无需等待,可以去处理其他事情(异步)。
    当IO 返回时,就会通知此工作进程,该进程得到通知,暂时挂起当前处理的事务去响应客户端请求。

事件驱动

在Nginx 的异步非阻塞机制中,工作进程在调用IO 之后,就去处理其他的请求,当IO 调用返回后,会通知该工作进程。对于这样的系统调用,主要使用Nginx 服务器的事件驱动模型来实现。

2.jpg
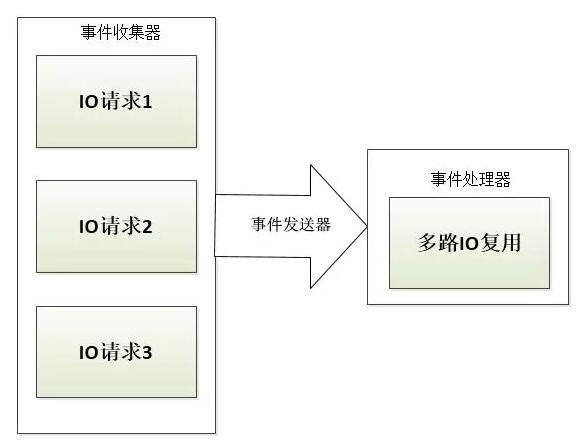
Nginx 的事件驱动模型是由事件收集器、事件发送器和事件处理器三部分组成。其中,事件收集器负责收集Worker 进程的各种IO 请求,事件发送器负责将IO 事件发送到时间处理器,而事件处理器负责各种事件的响应工作。
事件发送器将每个请求放入一个待处理的列表,使用非阻塞IO 方式调用“事件处理器”l来处理该请求。其处理方式被称为多路IO复用方法。
常见的包括一下三种:

  • select 模型
  • poll 模型
  • epoll 模型

设计架构

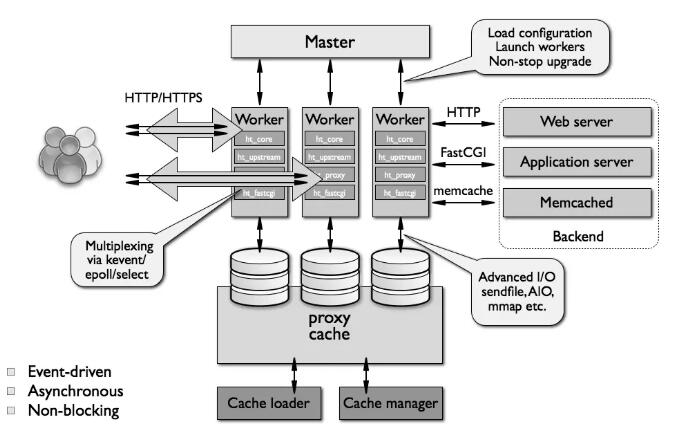
Nginx 服务器使用Master/Worker 多进程模式。
3.jpg
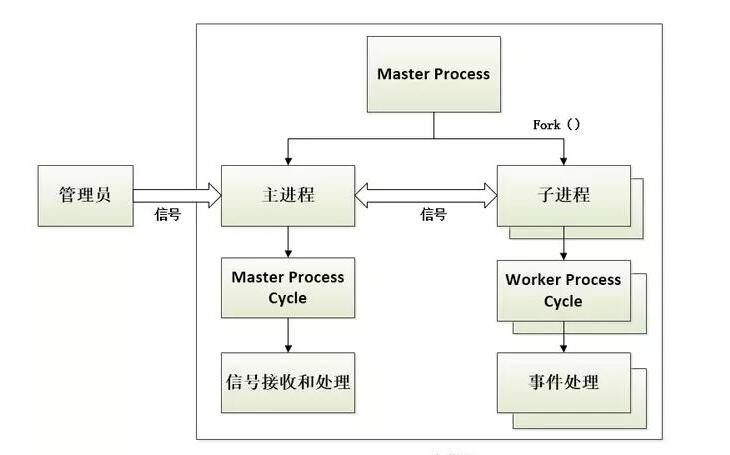
多线程启动和执行的流程如下:主程序Master process 启动后,通过一个for 循环来接收和处理外部信号;主进程通过fork() 函数产生子进程,每个子进程执行一个for 循环来实现Nginx 服务器对事件的接收和处理。

一般推荐Worker 进程数与CPU 内核数一致,这样一来不存在大量的子进程生成和管理任务,避免了进程之间竞争CPU 资源和进程切换的开销。
而且Nginx 为了更好的利用多核特性,提供了CPU 亲缘性的绑定选项,我们可以将某一个进程绑定在某一个核上,这样就不会因为进程的切换带来cache 的失效。

对于每个请求,有且只有一个工作进程对其处理。首先,每个Worker 进程都是从Master 进程fork 过来,在Master 进程里面,先建立好需要listen 的socket(listenfd)之后,然后再fork 出多个Worker 进程。
所有Worker 进程的listenfd 会在新连接到来时变得可读,为保证只有一个进程处理该连接,所有Worker 进程在注册 listenfd 读事件前抢 accept_mutex,抢到互斥锁的那个进程注册 listenfd 读事件,在读事件里调用 accept 接受该连接。
当一个Worker 进程在accept 这个连接之后,就开始读取请求,解析请求,处理请求,产生数据后,再返回给客户端,最后才断开连接,这样一个完整的请求就是这样的。

最后可以看到,一个请求,完全由Worker 进程来处理,而且只在一个Worker 进程中处理。
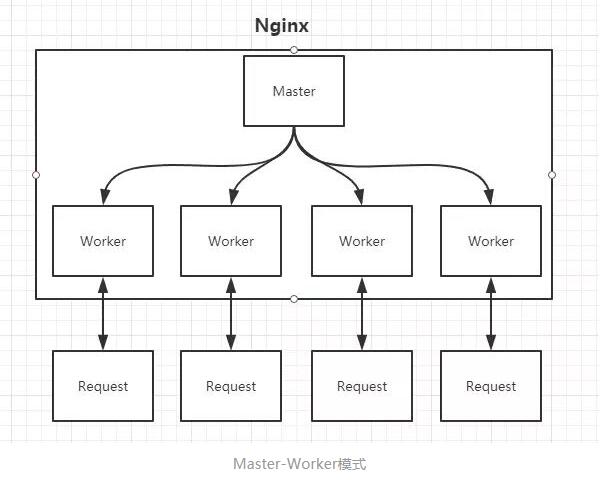
4.jpg

代理设计

在用户的视野里,代理服务器便是目标服务器。

1
2
3
4
5
6
7
8
9
10
11
12
13
14
server{
listen 80;
server_name example.yourdomain.com;
location / {
# 后端的 Web Server, 即真实服务器
proxy_pass http://www.your-real-domain.com;

# 定义 header 变量, 记录使用者的 IP
proxy_set_header X-Real-IP $remote_addr;
proxy_set_header X-Forwarded-For $proxy_add_x_forwarded_for;
proxy_set_header X-Forwarded-Proto $http_x_forwarded_proto;
proxy_max_temp_file_size 0;
}
}

面试

  1. Nginx 如何处理HTTP 请求
    Nginx 使用反应器模式。主事件循环等待操作系统发出准备事件的信号,这样数据就可以从套接字读取,在该实例中读取到缓冲区并进行处理。单个线程可以提供数万个并发连接。

  2. Nginx 中,如何使用未定义的服务器名称来阻止处理请求
    只需要将请求删除的服务器定义为:

    1
    2
    3
    4
    5
    Server {
    listen 80;
    server_name " ";
    return 444;
    }

    这样,服务器被保留一个空字符串,它将在没有”主机”头字段的情况下进行匹配,而一个特殊的Nginx 的非标准代码444 被返回,从而终止连接。

  3. 反向代理服务器的优点
    反向代理服务器可以隐藏源服务器的特征和存在。这对于安全方面来说是很好的,特别是使用Web 托管服务时。

  4. Nginx 服务器的最佳用途
    Nginx 服务器的最佳用法是在网络上部署动态HTTP 内容,使用SCGI、WSGI 应用程序服务器、用于脚本的FastCGI处理程序。还可以作为负载均衡器。

  5. 解释一下Nginx 服务器中的Master 和Worker 分别是什么
    Master 进程:读取请求、评估配置和维持运行
    Worker 进程:处理请求

  6. 解释是否有可能将Ngix 服务器的错误转换为502、503错误
    502 = 错误网关 503 = 服务器超载
    有可能,但是需要确保fastcgi_intercept_errors 被设置为ON ,并使用错误页面指令。

    1
    2
    3
    4
    5
    6
    Location / {
    fastcgi_pass 127.0.01:9001;
    fastcgi_intercept_errors on;
    error_page 502 =503/error_page.html;
    #…
    }
  7. 解释如何在URL 中保留双斜线
    要在URL中保留双斜线,就必须使用merge_slashes_off;
    语法:merge_slashes [on/off]
    默认值: merge_slashes on
    环境: http,server

  8. ngx_http_upstream_module 的作用是什么
    ngx_http_upstream_module 用于定义可通过FastCGI 传递、Proxy 传递、UWSGI 传递、Memcached 传递和SCGI 传递指令来引用的服务器组。

  9. C10K 问题
    C10K 问题是指无法同时处理大量客户端(10,000)的网络套接字。

  10. 陈述stub_status 和sub_filter 指令的作用是什么
    Stub_status 指令:该指令用于了解Nginx 当前状态的当前状态。如当前的活动连接,接受和处理当前读/写/等待连接的总数。
    Sub_filter 指令:它用于搜索和替换响应中的内容,并快速修复陈旧的数据。

  11. 解释Nginx 是否支持将请求压缩到上游
    可以使用Nginx 模块gunzip 将请求压缩到上游。
    gunzip 模块是一个过滤器,它可以对不支持”gzip” 编码方法的客户机或服务器使用“内容编码:gzip ”来解压缩响应。

  12. 如何在Nginx 中获得当前时间
    要获得Nginx 的当前时间,必须使用SSI 模块、$date_gmt 和$date_local 的变量。
    Proxy_set_header THE-TIME $date_gmt;

  13. 常见502 报错的原因
    配置错误、资源耗尽、


解决方案

HTTP 反向代理

配置文件
1
2
3
4
5
6
7
8
9
10
11
12
13
14
15
16
17
18
19
20
21
22
23
24
25
26
27
28
29
30
31
32
33
34
35
36
37
38
39
40
41
42
43
44
45
46
47
48
49
50
51
52
53
54
55
56
57
58
59
60
61
62
63
64
65
66
67
68
69
70
71
72
73
74
75
76
77
78
79
80
81
82
83
84
85
86
87
88
89
90
91
92
93
94
95
96
97
98
99
100
101
102
103
104
105
106
107
108
#运行nginx进程的账户
user www;

worker_process 1;
error_log /var/log/nginx/error.log
pid /var/run/nginx.pid;

events{
accept_mutex on;
use epoll;
worker_connections 1024;
}

http{
include /etc/nginx/mime.types;
default_type application/octet-stream;
access_log /var/log/nginx/access.log main;
# 开启传输文件
sendfile on;
# 持续连接时间
keepalive_timeout 65;
gzip on;

index index.html index.htm;
include /etc/nginx/conf.d/*.conf;
include /etc/nginx/sites-enabled/*;

# 定义上游服务器列表组
upstream web1 {
server 127.0.0.1:111 weight=1;
server 127.0.0.1:222 weight=1;
}
upstream web2 {
server 127.0.0.2:111 weight=1;
server 127.0.0.2:222 weight=6;
server 127.0.0.2:333 weight=7;
}

#定义一个服务器,其监听80端口,配置的域名是www.company.com
server{
listen 80;
# using www domain to access the main website
server_name www.company.com;
access_log /var/log/nginx/www.log

location / {
root /home/website_root;
}
}

#定义第二个服务器,其同样监听80端口,但是匹配域名是web.company.com
server{
listen 80;
# using web sub domain to access
server_name web.company.com;
access_log /var/log/nginx/web_access.log

location / {
root /home/web2_root;
proxy_pass http://127.0.0.1:8080/web/;
proxy_read_timeout 300;
proxy_connect_timeout 300;
proxy_redirect off;

proxy_set_header X-Forwarded-Proto $scheme;
proxy_set_header Host $http_host;
proxy_set_header X-Real-IP $remote_addr;
}
}
#定义第三个服务器,其同样监听80端口,但是匹配域名是web1.company.com,并把请求转发到web1上游服务
server{
listen 80;
# using web1 sub domain to access
server_name web1.company.com;
access_log /var/log/nginx/web1_access.log

location / {
root /home/web1_root;
proxy_pass http://web1;
proxy_read_timeout 300;
proxy_connect_timeout 300;
proxy_redirect off;

proxy_set_header X-Forwarded-Proto $scheme;
proxy_set_header Host $http_host;
proxy_set_header X-Real-IP $remote_addr;
}
}
#定义第三个服务器,其同样监听80端口,但是匹配域名是web2.company.com,并把请求转发到web2上游服务
server{
listen 80;
# using web2 sub domain to access
server_name web2.company.com;
access_log /var/log/nginx/web2_access.log

location / {
root /home/web2_root;
proxy_pass http://web2; # 跳转网址
proxy_read_timeout 300;
proxy_connect_timeout 300;
proxy_redirect off;

proxy_set_header X-Forwarded-Proto $scheme;
proxy_set_header Host $http_host;
proxy_set_header X-Real-IP $remote_addr;
}
}
}

负载均衡

配置文件
1
2
3
4
5
6
7
8
9
10
11
12
13
14
15
16
17
18
19
20
21
22
23
24
25
26
27
28
29
30
31
32
33
34
35
36
37
38
39
40
41
42
43
44
45
46
47
48
http {
#设定mime类型,类型由mime.type文件定义
include /etc/nginx/mime.types;
default_type application/octet-stream;
#设定日志格式
access_log /var/log/nginx/access.log;

#设定负载均衡的服务器列表
upstream load_balance_server {
#weigth参数表示权值,权值越高被分配到的几率越大
server 192.168.1.11:80 weight=5;
server 192.168.1.12:80 weight=1;
server 192.168.1.13:80 weight=6;
}

#HTTP服务器
server {
#侦听80端口
listen 80;

#定义使用www.xx.com访问
server_name www.helloworld.com;

#对所有请求进行负载均衡请求
location / {
root /root; #定义服务器的默认网站根目录位置
index index.html index.htm; #定义首页索引文件的名称
proxy_pass http://load_balance_server ;#请求转向load_balance_server 定义的服务器列表

#以下是一些反向代理的配置(可选择性配置)
#proxy_redirect off;
proxy_set_header Host $host;
proxy_set_header X-Real-IP $remote_addr;
#后端的Web服务器可以通过X-Forwarded-For获取用户真实IP
proxy_set_header X-Forwarded-For $remote_addr;
proxy_connect_timeout 90; #nginx跟后端服务器连接超时时间(代理连接超时)
proxy_send_timeout 90; #后端服务器数据回传时间(代理发送超时)
proxy_read_timeout 90; #连接成功后,后端服务器响应时间(代理接收超时)
proxy_buffer_size 4k; #设置代理服务器(nginx)保存用户头信息的缓冲区大小
proxy_buffers 4 32k; #proxy_buffers缓冲区,网页平均在32k以下的话,这样设置
proxy_busy_buffers_size 64k; #高负荷下缓冲大小(proxy_buffers*2)
proxy_temp_file_write_size 64k; #设定缓存文件夹大小,大于这个值,将从upstream服务器传

client_max_body_size 10m; #允许客户端请求的最大单文件字节数
client_body_buffer_size 128k; #缓冲区代理缓冲用户端请求的最大字节数
}
}
}

单点故障

Keepalived + Nginx 实现高可用,Keepalived 是一个高可用解决方案,主要是用来防止服务器单点发生故障,可以通过和Nginx 配合来实现Web 服务的高可用。

HTTPS 反向代理

配置文件

其他配置同HTTP 配置一样,只是在Server 的部分不一致。

1
2
3
4
5
6
7
8
9
10
11
12
13
14
15
16
17
18
19
20
21
22
23
24
25
26
27
28
29
30
31
32
33
#HTTPS服务器
server {
#监听443端口,443为知名端口号,主要用于HTTPS协议
listen 443 ssl;

#定义使用www.xx.com访问
server_name www.helloworld.com;

#ssl证书文件位置(常见证书文件格式为:crt/pem)
ssl_certificate cert.pem;
#ssl证书key位置
ssl_certificate_key cert.key;

#ssl配置参数(选择性配置)
ssl_session_cache shared:SSL:1m;
ssl_session_timeout 5m;
#数字签名,此处使用MD5
ssl_ciphers HIGH:!aNULL:!MD5;
ssl_prefer_server_ciphers on;

# 用于前端页面资源展示
location / {
root /root;
index index.html index.htm;
}

# 以前端访问静态资源接口代理后端api接口
location /vgbh/dog/ {
proxy_set_header X_Forwarded_For $proxy_add_x_forwarded_for;
proxy_pass http://127.0.0.1:8080;
}

}

文件服务器

使用 Nginx 可以非常快速便捷的搭建一个简易的文件服务。

Nginx 中的配置要点:

  • 将 autoindex 开启可以显示目录,默认不开启。
  • 将 autoindex_exact_size 开启可以显示文件的大小。
  • 将 autoindex_localtime 开启可以显示文件的修改时间。
  • root 用来设置开放为文件服务的根路径。
  • charset 设置为 charset utf-8,gbk;。
配置文件
1
2
3
4
5
6
7
8
9
10
11
12
13
14
15
16
17
18
19
20
21
autoindex on;# 显示目录
autoindex_exact_size on;# 显示文件大小
autoindex_localtime on;# 显示文件时间

server {
charset utf-8,gbk; # windows 服务器下设置后,依然乱码,暂时无解
listen 9050 default_server;
listen [::]:9050 default_server;
server_name _;
root /share/fs;

location / {
}

error_page 404 /404.html;
location = /40x.html {
}
error_page 500 502 503 504 /50x.html;
location = /50x.html {
}
}

跨域解决方案

web 领域开发中,经常采用前后端分离模式。各自独立的 web app 在互相访问时,势必存在跨域问题。
解决跨域问题一般有两种思路:

  • CORS
    在后端服务器设置HTTP 响应头,把你需要运行访问的域名加入加入Access-Control-Allow-Origin 中。
  • jsonp
    把后端根据请求,构造json 数据,并返回,前端用jsonp 跨域。
配置文件

在enable-cors.conf 文件中设置cors :

1
2
3
4
5
6
7
8
9
10
11
12
13
14
15
16
17
18
19
20
21
22
23
24
25
26
# allow origin list
set $ACAO '*';

# set single origin
if ($http_origin ~* (www.helloworld.com)$) {
set $ACAO $http_origin;
}

if ($cors = "trueget") {
add_header 'Access-Control-Allow-Origin' "$http_origin";
add_header 'Access-Control-Allow-Credentials' 'true';
add_header 'Access-Control-Allow-Methods' 'GET, POST, OPTIONS';
add_header 'Access-Control-Allow-Headers' 'DNT,X-Mx-ReqToken,Keep-Alive,User-Agent,X-Requested-With,If-Modified-Since,Cache-Control,Content-Type';
}

if ($request_method = 'OPTIONS') {
set $cors "${cors}options";
}

if ($request_method = 'GET') {
set $cors "${cors}get";
}

if ($request_method = 'POST') {
set $cors "${cors}post";
}

在Nginx 配置中include enable-cors.conf 来引入跨域配置:

1
2
3
4
5
6
7
8
9
10
11
12
13
14
15
16
17
18
19
20
21
upstream front_server{
server www.helloworld.com:9000;
}
upstream api_server{
server www.helloworld.com:8080;
}

server {
listen 80;
server_name www.helloworld.com;

location ~ ^/api/ {
include enable-cors.conf;
proxy_pass http://api_server;
rewrite "^/api/(.*)$" /$1 break;
}

location ~ ^/ {
proxy_pass http://front_server;
}
}

静态站点配置

配置文件
1
2
3
4
5
6
7
8
9
10
11
12
13
14
15
16
17
18
19
20
21
22
23
24
25
26
27
worker_processes  1;

events {
worker_connections 1024;
}

http {
include mime.types;
default_type application/octet-stream;
sendfile on;
keepalive_timeout 65;

gzip on;
gzip_types text/plain application/x-javascript text/css application/xml text/javascript application/javascript image/jpeg image/gif image/png;
gzip_vary on;

server {
listen 80;
server_name static.zp.cn;

location / {
root /app/dist;
index index.html;
#转发任何请求到 index.html
}
}
}

然后添加HOST:
127.0.0.1 static.zp.cn


引用


个人备注

此博客内容均为作者学习所做笔记,侵删!
若转作其他用途,请注明来源!